
Thrifted Wall Pocket Makeover DIY
There’s something special about a thrifted find that already has a story… even before you touch it.
This wall pocket was one of those pieces. Big, detailed, and full of potential, but it needed a little love to really shine. Instead of covering it up with heavy paint, the goal was to work with its character and bring out that aged, timeworn look.
Supplies List
- Thrifted wall pocket (metal or wood)
- Milk paint (Truffle + Flour Sack)
- Water (for mixing milk paint)
- Mixing cups + stir sticks
- Paintbrush (smooth brush recommended)
- Sandpaper (120 grit)
- Dark wax (for aging)
- Cloth or paper towels
- Duck cloth or similar fabric
- Stencils: 1776 Set , Patriotic Collection 2026 and Patriotic Transfers 2026
- Acrylic paint (red, blue, cream tones)
- Stencil brushes (including dome brushes)
- Painter’s tape
- Glue dots (for removable attachment)
- Faux florals
- Packing paper (instead of foam)
- Optional: raffia or decorative filler
Starting with the Finish (The Magic is Here)
Before anything decorative was added, the focus was on creating that soft, chippy, layered finish.
Milk paint was mixed using two neutral tones—Truffle and Flour Sack—to create a custom color that wasn’t too dark or too light. The mixture was thinned slightly so it wouldn’t fully cover the surface. You want some of that original texture to peek through.
As it dried, the finish started doing exactly what milk paint does best, crackling, chipping and settling into all those little details.
Once dry, a light sanding brought out the raised areas, and a dark wax was worked into the surface to deepen the details and give it that aged, vintage feel.
What Gives It That “Old” Look
- Layered milk paint (instead of solid coverage)
- Slightly uneven application
- Natural crackling and chipping
- Light sanding on raised areas
- Dark wax to highlight texture
All of that together creates a finish that looks like it’s been around for years… not something that was just painted today.
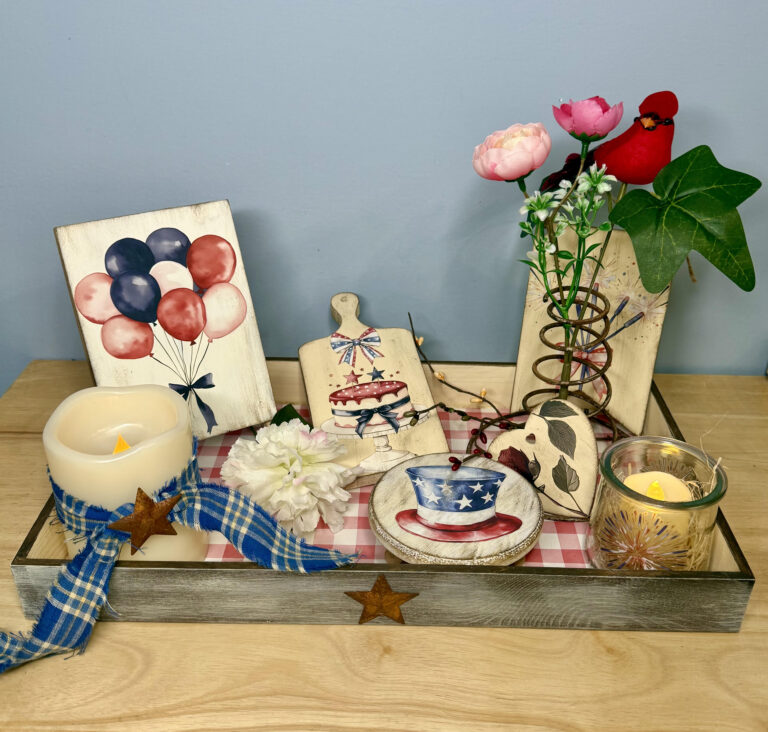
Turning It Into Something You Can Use Year-Round
Instead of making this a one-season piece, this project was designed to be flexible. The front insert is made from fabric—not glued down permanently—so it can be changed out anytime. That means one base piece can carry you through every season with just a quick swap.
For this version, a soft patriotic design was added using stencils and muted tones of red, blue, and cream. Nothing too bold—just enough color to tie everything together without overpowering the aged finish.
Creating the Fabric Insert
The fabric acts like a “label” for the pocket—and it’s what makes this project so versatile. A simple piece of duck cloth was used, then layered with stencil designs including “America,” “1776,” and a star. The colors were blended lightly so the design felt worn and soft instead of crisp and new.
A little tip here: If something doesn’t turn out perfectly, don’t panic. Add a swirl, a flourish, or another small detail to blend it in. Sometimes the best parts of a project come from fixing those little “oops” moments.
Adding the Florals (and Keeping Them Changeable)
Instead of foam, packing paper was used inside the pocket. That keeps everything lightweight and easy to adjust. The florals were simply tucked in and arranged until they felt balanced, with no glue, no commitment. Just a mix of stems, greenery, and a small pop of red to tie in the design.
You can easily switch these out later for:
- Fall stems
- Christmas greenery
- Spring florals
- Everyday neutrals
Same pocket. Completely different look.
How It All Comes Together
When everything is layered, the aged finish, the soft fabric design, and the florals, you end up with a piece that feels collected rather than crafted. It doesn’t look brand new and it looks like it belongs. And maybe the best part? You’re not stuck with it one way. You can change it.
Restyle it. Refresh it—without starting over.
A Simple Idea to Take With You
If you don’t have a wall pocket like this, you can still do this project. A large soup can, a tin, or even a small bucket can become your base. Add a handle, create a fabric insert, and you’ve got the same concept—just on a smaller scale. It’s not about the exact piece… it’s about what you can turn it into.